


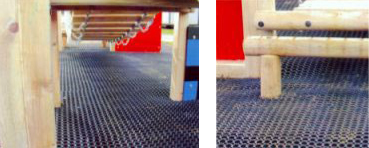
Compliant Grass Tiles (SS500) Specification & Installation
Environmentally friendly rubber matting system offering grass reinforcement and a tested, impact absorbing surface.
Features:
- H.I.C, of 3.0m on grass.
- Impact absorbent.
- Non-slip surface.
- Absorbs shock and noise.
- Excellent durability and comfort.
- Suitable for all weather and extreme temperatures.
- Honeycomb design allows liquid and debris to drain keeping surface dry and clean.
| Specification : Rubber Honeycomb Tiles | |
| Tile Size: | 1.5m x 1.0m x 23mm Thick |
| Tile Weight: | 19kg |
| Colour: | Black |
The area covered is secured in place with the use of galvanised or plastic fixing pins. Allow for 3 no. pins per outer edge of the total carpet area.
Tools Required:
- Tape Measure
- Stanley knife
- Rubber gloves
- Hammer
- Grass edge cutter
- Spade
- Cable ties
- Grass Seed
- Rechargeable drill and 6mm drill bit
- 3 no. Edge fixing pins at the rate of 3 no. pins per outer edge of tile area
Installation Instructions:
- Mark out the area to be covered with the Compliant Grass Tiles.
- Compliant Grass Tiles can be laid directly onto existing grassed areas. The area should be filled in if uneven with topsoil and be compact.
- Sow grass over this area.
- (OPTIONAL) For soft (boggy) areas lay an open coarse membrane. Leave about 150mm in from the outside edge.
- Now lay out the Compliant Grass Tiles over the area to be covered, cutting around any equipment or obstacles if necessary.
- Fasten edges together using cable ties and trim tails.
- Cut into the ground about 75mm deep along the edge of the perimeter area to be covered using a grass edge cutter or similar.
- Roll back the Compliant Grass Tiles. Starting about 150mm in from the outside edge of the tiles, use a spade and cut the top turf away in the direction of the 75mm deep cut finishing at the depth. This will leave a wedge shape channel. Continue around the perimeter of the laid tiles.
- Roll the Compliant Grass Tiles back and down into the channel and pin the edge through the small holes in the tile and into the ground, Use 1 pin per tile corner and 1 pin midway. You should now have a ramp edge all the way around. Now cover the ramped area with topsoil and seed. Bring the level back up to its original level and flatten.
|
< Return to Compliant Grow Through Downloads
|
|
|