We use cookies to make your browsing experience better, personalise content or ads and analyse our traffic. By clicking “Allow Cookies”, you consent to our use of cookies. Learn more.


Playing Surface Installation Requirements
Resurfacing an existing concrete base
(Note: Most of the following information also applies when fitting a playing surface onto a new base)
If the old cricket playing surface remains on the concrete, this will need to be removed.
Generally, the turf around the perimeter of the base will have grown over to some degree and covered the edge of the old cricket playing surface. This will need edging back with a spade or half moon to fully expose the old playing surface and base.
The degree of difficulty removing the old playing surface will depend on what type of adhesive was used and how long it has been down. If you are lucky, the adhesive will have broken down and the old surface can be removed easily. In the worst case, the adhesive bond will still be strong and in this case it is generally best to cut the old surface into narrow strips and rip these up rather than trying large areas. A heavy duty scraper or a spade between the surface and base may assist.
Once the concrete base is exposed you can assess its condition. There may be some cracks that have appeared over the years. Run a straight edge across these to check there is no "step" between one side of the crack and the other. This is most important if the crack is situated where the cricket ball is going to pitch, as it can cause unpredictable or dangerous bounce.
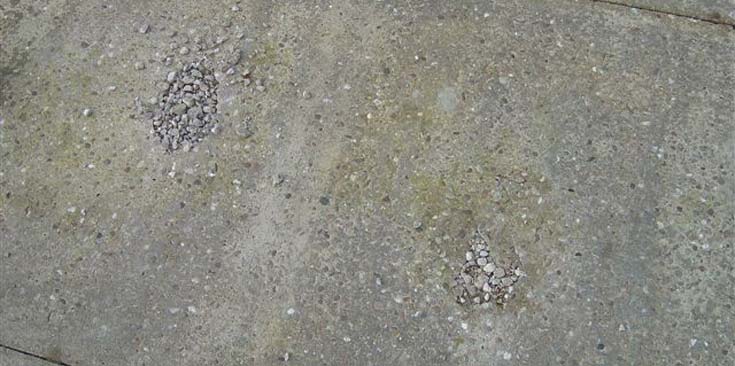
The surface of the concrete should be reasonably smooth and level with no noticeably high or low spots. Any loose or flaky areas of old adhesive should also be cleaned off.
If the base is rough or uneven it is best to rectify this by grinding the surface. Mechanical floor grinders which work using a pair of rotating discs fitted with grinding blocks are available from most tool hire centres. It may take some time even with this type of machinery to produce an acceptable finish.
REMEMBER ANY UNEVENNESS IN THE BASE WILL BE MIRRORED IN THE NEW CRICKET PLAYING SURFACE.
Generally, levelling the base by thin surface screeds applied to the concrete is not recommended. Although many are sold as weather proof or outdoor use they almost certainly will "blow" or lift off the concrete slab due to water, frost and ice leading to an uneven and hollow base. Any new cricket playing surface bonded to it would be ruined and the expense to then rectify the wicket would be considerable.
Be realistic about the condition of the concrete base. If it is beyond saving, the best course of action is to break it out and replace it with a new slab, as sometimes no amount of time and money spent on the old base will produce satisfactory play from it.
Once you have achieved a suitable standard of base you can commence installation of the new playing surface.
New concrete bases
The concrete should be dry and you should be reasonably confident the weather will remain dry whilst the installation is carried out.
Newly cast concrete bases should be left 4-6 weeks to fully cure and dry out before attempting to stick down the playing surface. The surface of the new concrete may be very dusty which will absorb a lot of adhesive and make it difficult to trowel on. It may help to give the surface a light grid and blow off all the dust with a leaf blower or apply a suitable concrete primer to kill the dust.
Fitting the playing surface to the base
Ensure you have allowed sufficient length and width when you calculate and order the playing surface. Standard playing surface widths are 2m and 2.74m, and with some a 4m wide roll is available. Not all types of playing surfaces are manufactured across all of these widths.
Again calculate your adhesive requirements. Manufacturers provide guidance on coverage rates but these will vary in practice depending on how the adhesive is applied and how good the base is. If the concrete surface is rough or porous, the manufacturer's coverage rates may not be achievable.
It is advisable before starting to stick the playing surface to roll it out fully over the base to check for any manufacturing defects and to be sure it is the correct size to fit the base. If it is OK to proceed, the best method of installation is to add some weights to one half of the surface and then roll the other end of the wicket back up carefully to around the middle. The weights should prevent the carpet from moving out of alignment with the base - as once you start applying adhesive, if the carpet runs off line with the edge of the concrete slab you will not be able to correct it.
Read the instructions on the adhesive container. Some products are single component polyurethanes and are used straight from the container. Others may be 2 component polyurethanes where part A and part B need to be mixed together before use. The mixing of these needs to be very thorough, otherwise the adhesive will not set properly. Only mix in the factory supplied pre-measured quantities and only mix as much as you can use within the working time of the product.
From experience, the best method is to apply the adhesive to the concrete with a smooth steel float or one with small notches. Apply the adhesive to the full width of the slab and 1 or 2 metres back from the rolled up carpet at a time. While the adhesive is still wet, roll the playing surface into it so the adhesive transfers onto the reverse of the carpet to achieve a good bond. Continue with this method to the end of the first half of the playing surface.
Next remove the weights from the un-bonded end and carefully roll this end back to the middle, until you reach the start of the surface you have already bonded (which is hopefully by now starting to grab). In the same manner proceed to stick down the remaining half of the playing surface until it is fully bonded.
Finally, trim the edges of the playing surface with a Stanley knife and straight edge so that it is level with the edge of the concrete.
A full range of cricket playing surfaces and adhesives will be available from specialist cricket suppliers, typically alongside an installation service should you require it.
Playing Surface Installation Tips
- Install the playing surface as soon as practical after delivery. If the roll is kept in store for a long period, ripples or wrinkles can form due to its weight on one point. Rotate the roll occasionally to minimise this. Don't store the roll on its end and don't put anything heavy on top of it.
- Roll the playing surface out over the base for an hour or so before starting installation to allow it to settle and warm up, as this will make it easier to lay.
- Pay particular attention to making sure there is sufficient adhesive around the edge to prevent the playing surface lifting or being ripped up.
- Single component adhesives generally will "grab" the playing surface well. You will need to have a suitable roller of around 50kgs to hand to roll the playing surface as you lay it. This will press it into the wet adhesive and ensure it is fully bonded to the base. It is good practice to roll it several times while the adhesive is setting with particular attention to the edges.
- With 2 component adhesives the bond is more gradual and there is less initial grab. Rolling is also necessary but in addition to this you may need to add weights until the adhesive has cured.
|
< Return to Cricket Downloads & Resources
|
|
|