We use cookies to make your browsing experience better, personalise content or ads and analyse our traffic. By clicking “Allow Cookies”, you consent to our use of cookies. Learn more.


How to Hang a Tennis Net
To ensure that the lifespan of any new tennis net is maximised, it should be correctly hung between the tennis posts. Incorrect installation or use of an unsuitable tennis net can not only look visually unappealing on the court, but can also cause damage to the winder mechanism within the posts themselves.
Whilst the hanging process can vary slightly depending on the type of posts being used, this datasheet covers some the key step by step points to follow whilst hanging a standard British tennis net with a loop and pin headline wire.
Step 1: Prepare!
Remove any existing tennis net by fully unwinding the mechanism and removing the ferruled end of the headline wire from the spindle of the winder. Remove the net retaining bars (or untie the net from the pig tails if you have older style posts), then unhook the net from the anchor post and roll up the old net.
TIP: This is a great opportunity to re-grease the winder mechanism, which should be kept greased throughout its life.
Most winders will fail either because of poor maintenance that drastically reduces their lifespan or due to a cheap or non-standard tennis net - these may feature an oversized headline wire, which causes the winder mechanism spindle to overload and break.
Clear any unnecessary equipment from the court to create plenty of working room.
If you've got a brand new tennis net, carefully snip or undo any ties that are preventing the net from unrolling. Be very careful not to cut the net itself!
Step 2: Unroll the tennis net and lay it flat.
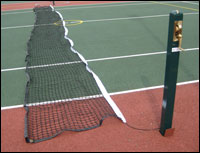
Between the tennis posts, unroll the new tennis net across the entire width of the court, making sure the net is positioned the correct way around.
The 'loop' at the end of the headline wire should be closest to the anchor post, and the ferruled or 'pin' end of the headline wire should be located closest to the winder post.
Check there are no twists in the netting, so that the net lays flat on the court between the two posts.
Step 3: Inspect!
Now is a great time to inspect the net and headline, particularly if it's a season or more old.
Check for natural wear and tear (or vermin damage if it has been in storage) and assess whether it's worth repairing or replacing.
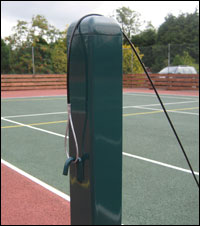
Step 4: Attach the net to the anchor post.
Now begin attaching the net.
Starting with the anchor post end, loop the headline wire around the retaining hook on the anchor post.
There is typically a notch or wheel at the top of the anchor post, so drape the headline wire over the top of the post in the direction of the winder post. When the net is tensioned later, the headline wire should sit neatly into this groove or over the wheel. It may need to be guided into position later on.
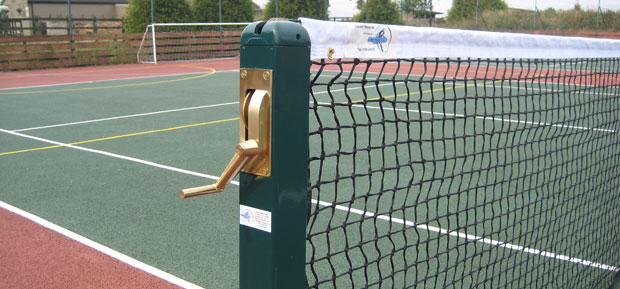
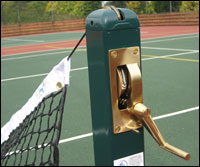
Step 5: Insert the pin into the winder mechanism.
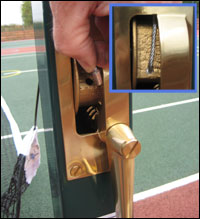
Thread the 'pin' end of the headline wire over the brass wheel and down through the top of the post until it emerges through the winder mechanism. Alternatively, pass the headline wire over the brass wheel and down the outside of the winder post, if preferred.
Rotate the winder handle until a small hole (approx 5mm) is visible on the spindle of the winder, just large enough to insert the ferruled 'pin' end of the headline wire.
Insert the ferruled 'pin' of the headline wire into this hole and whilst holding the wire in place with one hand, give the winder a few turns to prevent the pin from falling out.
TIP: Avoid cheap, low quality tennis nets, as these may feature a pin that is too large or too small to fit into this hole.
Step 6: Tension the net.
Keep turning the winder handle to increase the tension of the net, making sure to check that the headline wire is sitting correctly between the notches or wheels located at the top of each post.
Step 7: Check the height of the net.
With the net tensioned, check the height with an appropriate net height gauge and alter the centre guide adjuster as required.
Loosen or tighten the tension accordingly.
Step 8: Attach the net to the sides of the posts.
Finally, on each of the posts, thread the net retaining bars down through the side of the netting, alternating between each side of the net as you go through each hole. Alternatively, if you have older style tennis posts, secure the net to each of the pig tails whilst trying to keep the sides of the tennis net as vertically parallel to the posts as possible.
Step 9: Tidy up!
Give the net a final check to ensure the height is correct and remove any unwanted items from the court.
Once you're satisfied everything is in order, it's time to play tennis!
|
< Return to Tennis Downloads & Resources
|
|
|